Sunday, August 28, 2016

Jager

I had a few Holger Ericsson figures floating about so I decided to use them to create a small unit of Jager modeled on some in the possession of Stokes. Just eighteen figures but just right in my view.

Not entirely sure, but they will probably join the Duchy of Alzheim Army with an option on that of the Kingdom of the Czechs of which more anon.

Tuesday, August 16, 2016

The Flight to Fugitives’ Drift - Rules

I won't pretend these are definitive, but they are my latest working copy.


The Flight to Fugitives’ Drift

Deployment
British troops deploy at one end of the table at the bottom of the valley (see diagram). The 'valley' represents the Fugitives' Trail. At the beginning of every move the British player must throw 1D6. That is the number of British figures you may place in the British Entry Zone. Another 1D6 will tell you the number of turns for which that group may fire before exhausting their ammunition supply.


In the case case of the Zulu Player, both long edges of the table are divided into six 30cm wide Zulu Entry Zones. Zulu warriors may enter any of these zones (except for that adjacent to the British Entry area) as the British soldiers move down Fugitives' Trail. To enter the first zone, the Zulu player must throw a 6, the second, a 5 or a 6, the third, a 4, 5 or 6 and so on. If they enter, then a further D6 must be rolled for the number of warriors who may enter from each side, each side being diced for separately. The zones are activated as the British player crosses the boundary between each successive Zulu Entry Zone. Once activated, Zulu Zones continue to admit more warriors per turn as diced for on each subsequent move.


Turns
In a turn a player can activate all their units and undertake the following actions:

Move, Shoot, Close Combat
Move
  • All movement is 8 inches.
  • Zulus may only Move or Shoot, Europeans may move 4” and shoot.

Shooting
  • Shooting is done at 1 die per figure.
  • Regulars need to roll a 4-6 at targets nearer than 10" to his and 5-6 at longer ranges. There is no maximum range.
  • Zulus need to roll a 6 no matter the range to hit.
  • Officer Pistols have a maximum range of 4” and may be fired twice per move.
  • -1 on dice rolls if target is behind cover or has moved on the Move phase.

Close Combat
Takes place at the end of a players turn. Resolved using opposed dice rolls. Loser is killed or wounded. Ties ‘rebound’ figures 1”.

Close Combat Factors
  • Key figures (Officers, NCOs)                           +1
  • Infantryman                                                       +1

Not to scale and not 100% accurate, but...

Monday, August 08, 2016

The Long Road to Fugitives' Drift - 2nd Playtest


Over the course of this weekend, I play-tested the 'Fugitives' Drift' game a couple of times. The first time I learned a lesson or two which I applied to the second - primarily it was about British strength and to remember that the British were meant to be fleeing and not fighting! The scenario was pretty much as posted in my previous. I'll post up the rules I used soon. They are basically a one-page convention set that we have been using and modding up for the past 7 years. The current version has been re-jigged for the Zulu wars as a grand skirmish set.


 The 24 British soldiers start in the centre of the short edge of the table whilst two units, each of 10 Zulus come from each side.
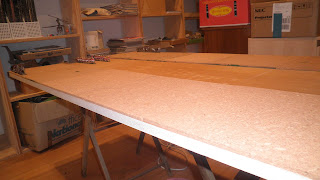
It's a long Road to Fugitives' Drift
 The game was played down the length of a 3' by 6' table. Each cork tile is 12" square and represents a Zulu Deployment area.
The Zulu Leader - The Fat Induna
The first couple of moves saw the British moving in steady 4" moves down the table. Their fire was particularly effective at this point, killing 13 Zulu figures in the first move and another 11 in the second. The Zulus attempted to form large units bu mobbing up the units that were coming on as the British moved into the second 'Zone" of the table.
Zulu Reinforcements
 Poor initial rolls for reinforcement allied with the slow British advance meant that Zulu numbers were initially quite low.
More 'reinforcements'
 The British have taken no casualties at this point. The British player, seeing an opportunity took his next two moves as full 8" moves with no opportunity to fire. The Zulus continued to bring on only moderate amounts of reinforcements, however, the further unit id Zulus was starting to wax dangerously large, reaching 17 figures by the end of the fourth move.

 The British reverted to shot moves to allow some firing
 It was effective
 But it did seem the Zulus had a plan.
 A cunning plan.
 Although the British continued to move/fire, they were far enough down the table thatthe Zulus were now able to get substantial numbers of figures onto the table. The British lost heavily in their first round of HtH and never really recovered.
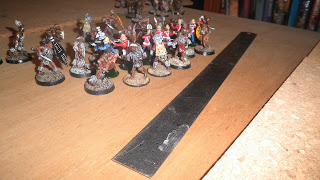
The last of the 24th succumb...
As British numbers waned, those of the Zulus waxed mightily and although they displayed all the pluck in the world, it was no match for the now massively outnumbering Zulus who enveloped them from all sides.
Only a few men survived to tell the sad tale . As to the fate of the rest of the 24th, perhaps it is kindest to simply draw a curtain...

Thursday, August 04, 2016

Fugitives' Drift

Just a brief follow up from my last post.

Here's how I'd do the nuts and bolt of a Fugitives' Drift skirmish game.


Quite a small table, say 3-4 feet by about 6 feet long. 20 assorted British figures have to get to the Drift. Game would be played down the length of the table. Aim is to get as many Brits off the far edge as possible. 

Zulus would enter from each table side as the game progresses. I imagine half a dozen entry points on each side that would activate as the retreating figures 'trip' them by entering each successive zone. Randomised numbers of Zulus then enter 1D6 per entry point. Except for the first where 10 Zulus enter from each of their table edges.

Give two of the British figures superior HtH stats to act as line-breakers.

The Zulus would move slightly faster than the British, or would having to engage in HtH slow them down enough?

What do you think? 

Tuesday, August 02, 2016

Isandalwana - a few thoughts should I ever do it as a Convention game.

This post is more a note to myself in case I ever need to go back to this. It's been inspired by the reading I have done around Rorkes' Drift. Apologies if it bores anyone, but this is more so I can get my own thoughts in order.

Rough OOB:

No 2 Column
Durnford
Natal Native Horse - 25 Figs
Natal Native Contingent - 24 Figs

No 3 Column

Pulleine
Battery represented by 1 gun.
1st-2nd/24th Regiment of Foot - 80 figs
'Colonial' Cavalry and MI - 6 figs
Natal Native Contingent - 80 Figs
Throw in a handful of figures for Engineers, cooks, camp followers and so on.
About 200 figures in total.
Need at least 300 Zulus with casualty recycling.
Note i have dispensed with Durnfords' artillery and the rocket troughs. They had no effect on the battle and seemed pretty derisory to me anyway.
If ever this all came onto the table, I would picture a game of three parts:
1. The engagement and overwhelming of the firing line, which is where the OOB above would come into play. Since throwing down that OOB, I have learned that only half the infantry were in the firing lines as the rest were packing the camp up. Perhaps as few as 50 men per company. Maybe 300 infantry in the line Companies in total.
It'd look something like this.


2. The life-or-death struggle in the Camp. The remaining half of the infantry plus supernumerary figures fighting back-to back in a large skirmish game among tents and wagons. The goal would be to attempt to defend the camp or failing that to exit in good order towards Fugitives' Drift. Defenders ought to be outnumbered by three-to-one prima facie with casualty recycling.
3. The pursuit to Fugitives' Drift. 10-20 assorted British figures. Game would be played down the length of the table. Aim is to get as many Brits off the far edge as possible. Zulus would enter from each table side as the game progresses. I imagine four entry points on each side that would activate as the retreating figures 'trip' them by mofing parallel to them. Randomised numbers of Zulus then enter - perhaps 2D6 per entry point.
#1 would be a large scale game. #2 and #3 would be large and small skirmishes respectively.