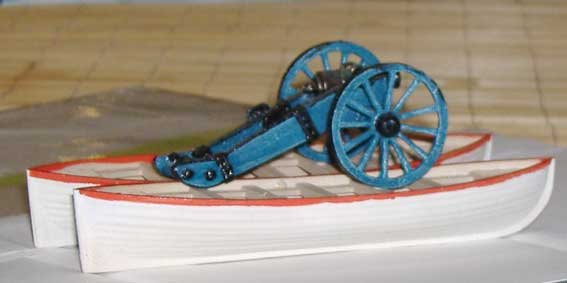
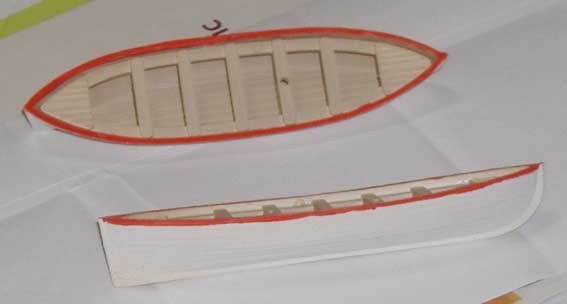
This morning I finished painting the first two of my five small boats. I intend that they'll be fairly versatile, being used as pontoon bridges, ferries &c.
In the latter role, I will build a small, detatchable deck to run a gun or other stores onto.
This leads me to think that it is time foe me to create a corps of pontoniers and recruit some engineers.
Furthermore, I might have to get some gabions - I'm thinking of building a pair of battery positions for some siege artillery. Can anyone suggest a method of manufacture or, failing this, a manufacturer?
5 comments:
Hi, Greg
Many years ago, I built some gabions for a 54mm model I was doing, but it should work in 25mm as well. I used grass stems. I first set a circle of stems (make sure you use an odd number) in glue on a plastic card base, and put a lot of thinner stems in water. When the glue was set, I just dipped the wet stems in dilute PVA and wound them around the verticals, going alternately inside and outside the verticals. When the gabion was high enough, I lined it with plastic (just a bit of polythene pushed down inside with a finger and trimmed to fit) and filled the resulting `cup' with plater of paris (add some water paint to the plaster)and sprinkled the top with sand/dust. When the whole thing is dry, give it a wash/drybrush as necessary - it won't need much. Cost - virtually nil. Time - about 5 minutes per gabion total (plus drying time).
Good luck
John
The May issue of either Wargames Illustrated or the latest issue of the magazine from Spain have a step by step essay on how to make your own gabions. It's such a labor intensive process that i would strongly recommend buying resin gabions from Hovels or other companies. RSM95 makes them from lead as well.
The scratch-built gabions were constructed thusly:
first, scribe a circle on some cardboard. Then take sewing pins or bits of stiff wire and poke them into holes that you have made in the cardboard. You will now have a circle of pins sticking out of the cardboard. Then take some thin electrical wire or thick florists' wire and weave the wire in and out amongst the pins, its just like weaving a basket. then when the weaving process is done, take some epoxy putty and fill in the interior of the gabion. On the top, take a toothbrush and press it into the putty to give it the appearance of loose dirt. You may also want to build a putty dirt base around the outside bottom of the gabion. Again, stipple the putty with the tooth brush. When it dries, then prime and paint.
The commercial gabions are so good and relatively cheap that I would never build them from scratch.
regards,
Alte Fritz
Gentlemen, making them by hand DOES sound rather labour-intensive. I'm thinking of 50-60 of the wretched things.
Rather than buy them, (I like to spend the money on toy soldiers!) maybe I ought to lovingly hand-craft one and then cast it in resin? Perhaps if they are really cheap, I'll just buy them...
Greg
If the price is right, I'd say buy them but it would make a nifty little resin casting project.
If I were going to cast my own, I think I'd make the master out of Sculpey or something similar and model it as a solid piece instead of weaving bits and pieces together.
I may have to give this a try myself!
Patrick
Years ago i made my own gabbions from lengths off dowel, hessian and thin wood strips....cut the dowel to slightly shorter than the height of gabbion you want, work out how many upright posts look right for your model gabbion and stick half of them (i.e. double spaced) to you lengths of dowel (these posts should project about 1 cm from one end - the top - of you dowel), cut a strip of hessian long enough to wrap once round your dowel and that is just a touch shorter than the posts you've cut, glue your hessian to the dowel, glue the rest of your posts to the dowel/hessian (between the original posts that are now underneath the hessian), add some texture to the top of the dowel using sand or filler....and then paint the whole lot appropriately. A quick, cheap amd easy method IMHO...
Post a Comment